How to screenshot on a Mac: every shortcut (and how to post it to X)
To screenshot on a Mac, press Shift-Command-3 for the whole screen, Shift-Command-4 to drag over an area, or Shift-Command-5 for a toolbar with every option, including screen recording. Add the Control key to either of the first two and the picture goes to your clipboard instead of a file. The same keys work on every MacBook, iMac and Mac mini. Below: every shortcut, where screenshots go, how to crop and fix them, and how to get one onto X quickly.
What are the Mac screenshot shortcuts?
| Shortcut | What it captures |
|---|---|
| Shift-Command-3 | The whole screen |
| Shift-Command-4 | An area you drag over |
| Shift-Command-4, then Space | One window (click it) |
| Shift-Command-5 | Toolbar: screen, window, area, screen recording, options |
| Control + any of the above | Copies to the clipboard instead of saving a file |
| Shift-Command-6 | The Touch Bar, on MacBooks that have one |
A few details that save time:
- Shift-Command-4 turns the pointer into a crosshair. Let go of the mouse and the capture is taken. Press Escape to cancel.
- While you drag, hold Space to move the whole selection instead of resizing it. Useful when the size is right and the position is wrong.
- In window mode (Shift-Command-4, then Space), hold Option as you click to leave out the window's drop shadow.
- Shift-Command-5 opens a small toolbar at the bottom of the screen. It also records the screen or a selected part of it.
How do you screenshot on a MacBook?
Exactly the same way. MacBook Air and MacBook Pro use the same shortcuts as any other Mac: Shift-Command-3, Shift-Command-4 and Shift-Command-5. On older MacBook Pro models with a Touch Bar, Shift-Command-6 captures the Touch Bar itself.
How do you copy a screenshot instead of saving a file?
Hold Control with the shortcut. Control-Shift-Command-3 copies the whole screen, and Control-Shift-Command-4 copies a selected area. Nothing is saved to disk. Switch to the place you want it and press Command-V.
This is the quickest route when you only need to drop a picture into a chat or a document. It is also a good habit for anything sensitive, because there is no stray file left behind.
Where do Mac screenshots go, and how do you change it?
By default they are saved to the Desktop as PNG files named like "Screenshot 2026-11-18 at 10.42.07". To change the location, press Shift-Command-5 and click Options. Under Save to you can pick a folder such as Documents, send captures to the clipboard, or choose another location. The same menu has a Timer (5 or 10 seconds), a switch for the floating thumbnail that appears in the corner after a capture, and Remember Last Selection.
If your Desktop fills up with screenshots, pointing "Save to" at a dedicated folder is the single most useful change you can make.
How do you crop a screenshot on a Mac?
The fastest way is the floating thumbnail. Click it right after the capture, and the Markup editor opens with a crop control. You can also open the saved file in Preview, make a rectangular selection and choose Crop from the Tools menu.
Two things to watch. Cropping an image that already went out is not a cure for a leak, so crop before you share. And if the picture shows anything private, hiding it properly is a separate job: blur is not enough. I cover that in how to redact an API key in a Mac screenshot.
Why is screenshot on Mac not working?
The usual causes, in order:
- The shortcut is turned off or reassigned. Open System Settings, then Keyboard, then Keyboard Shortcuts, then Screenshots, and check that the screenshot shortcuts are ticked.
- Another app took the shortcut. Screenshot apps (including mine) and some cloud storage apps can claim Shift-Command-3 or Shift-Command-4. Check the app's settings, or quit it and try again.
- You can't find the file. It may be going to a different folder or to the clipboard. Press Shift-Command-5, open Options, and look at Save to.
- The capture is black. Some protected content, such as streaming video, shows up black in screenshots on purpose.
How do you change the screenshot format from PNG to JPG?
macOS saves PNG by default. To switch to JPG, open Terminal and run:
defaults write com.apple.screencapture type jpg; killall SystemUIServer
Replace jpg with png to switch back. PNG keeps text sharper, which matters for screenshots of code and dashboards.
Can you take a scrolling screenshot on a Mac?
Not with the built-in tools. macOS has no scrolling capture. CleanShot X and Shottr both offer it. ScreenPost does not, so if long scrolling captures are your main need, one of those is the better pick. See the best screenshot editor for Mac for how they compare.
How do you post a screenshot to X from a Mac?
With the built-in tools, the loop has several manual steps:
- Take the screenshot and, if needed, crop or annotate it.
- Find the file, or copy it with the Control shortcut.
- Open x.com, start a new post and attach or paste the image.
- Write the text and press Post.
None of that is hard. It just repeats every time you post a screen, and if you post often, the repetition is the real cost.
How does ScreenPost shorten the steps?
It folds the steps into one flow. You press a shortcut, grab an area, a window or the screen, mark it up, and write the post in a composer that looks like the post: links, mentions and hashtags turn blue as you type and the cost shows before you send. Press Command-Return and it is posted. No browser tab and no file hunting.
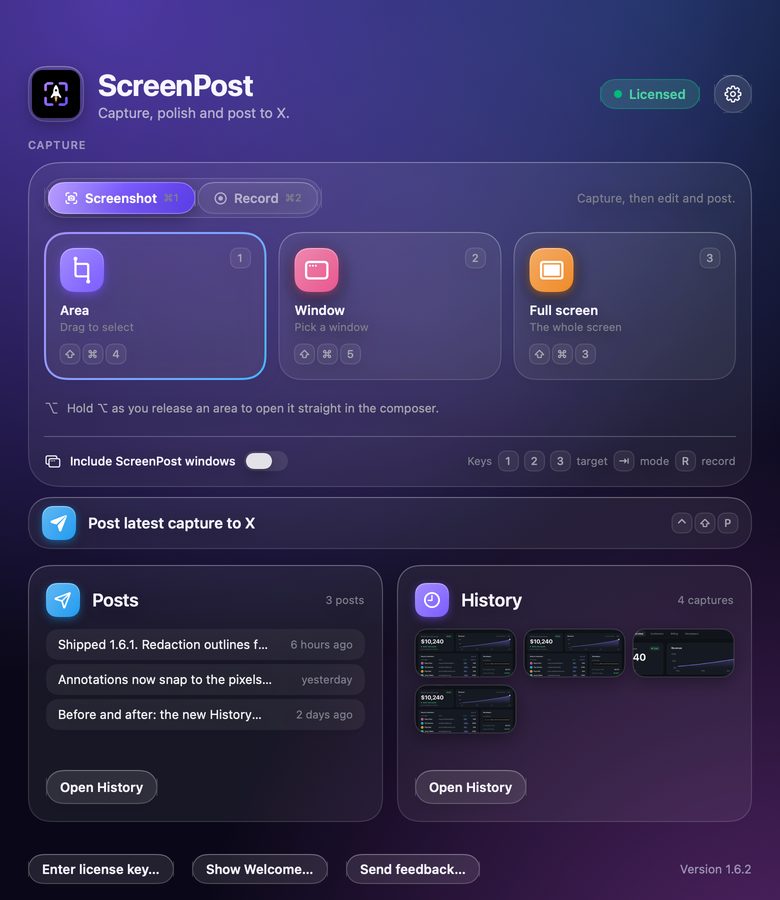
By default ScreenPost keeps the familiar shortcuts: Shift-Command-3 for the full screen, Shift-Command-4 for an area and Shift-Command-5 for a window. It can also take over the macOS ones if you want it to. The editor adds what the built-in Markup lacks: automatic redaction of API keys, emails, IP addresses and card numbers, and Beautify for a background, padding and rounded corners.

Posting through x.com is free and always available. For one-click posting you connect your own X developer app and pay X directly, about 1.5 cents a post, or about 20 cents with a link, with no markup. The 7-day trial includes 3 one-click posts. See the comparison with CleanShot X if you want to weigh it against a bigger capture suite.
FAQ
What is the screenshot command on a Mac? Shift-Command-3 for the full screen, Shift-Command-4 for a selected area, and Shift-Command-5 for the toolbar with options and screen recording.
How do I take a screenshot of one window? Press Shift-Command-4, then Space, then click the window.
Why can't I find my Mac screenshots? They go to the Desktop unless you changed the setting. Check Shift-Command-5, then Options, then Save to.
Can I post a screenshot to X without opening a browser? Yes, once you connect your own X developer app: ScreenPost then posts in one click. Without one, it opens x.com with your post ready to send.
I built ScreenPost for people who post their screen to X every day. Try it free for 7 days, no card: screenpost.app. It needs macOS 14 or later and an Apple silicon Mac.